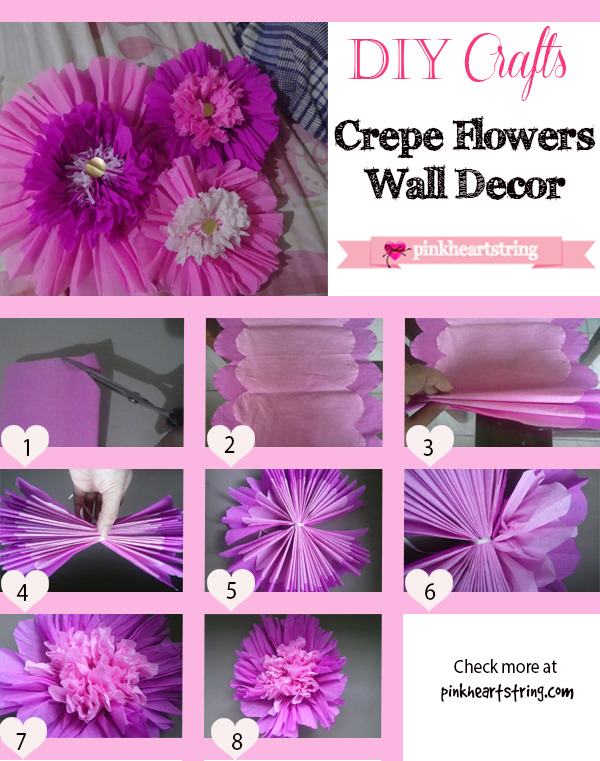
Do you have a boring wall you want to add some life and interest to? There are so many ways to enhance a wall’s look. You can cover it with wallpaper, add a framed picture or a gallery, add a wall sculpture, and even re-paint it. When painting, you can either paint creatively, combining different colors, or add texture.

But you can also DIY some wall decor, too. Yes, you can easily frame a photo, but you can also make a wall-mounted flower. This is what I did to my bedroom. There is a hole in the upper part of my wall because it was intended for an exhaust. Since we don’t need to install one anymore, I covered it with paper flowers.
It is very easy to make. And I want to share it with you. You can make something bigger or smaller ones- depending on what you need. For my crepe paper flowers wall decor, I made large ones because I need them to cover a hole in my wall.
What You Need:
Crepe Paper or Tissue Paper of different colors
String or ribbon
Scissors
Cardboard as backing

How to Make a DIY Crepe Paper Wall Flower Decor
- First, cut the edge of the crepe paper with a scissor, forming a curve. You can also cut it with a pointed edge to give the flowers a different look. Do the same with another color, which should be shorter in length than the other one.
- Top the shorter paper on the longer one. Make sure their curves are aligned.
- Start folding them together in pleats, as seen in the picture.
- When you are done folding, tie the center part with a ribbon or a string.
- Slowly spread the paper and meet both ends together to form a circle.
- Then pull the edges upward so it will bloom.
- Pull all the edges of both the larger and smaller petals.
- Then, attach it to the cardboard, or you can just install it directly to your wall.
- For my flowers, I made three of different sizes. I added a gold circle and glued it on top. You can also add strips of paper on top, as I did with mine. I glued all three flowers to the cardboard before installing it on the wall. Pretty easy, right?
You can make one for your home too!

Those are beautiful! I think they'll look great in my office space or even as a garland for a party! Thank you for sharing! I love them so much!! So creative!
These are so cute! Great idea 🙂
xo, Stephanie
astyleofherownblog.com
These are so pretty! My daughter would love to have something like this in her room, thanks for the idea!
those are so cool and I love the color 🙂
Very cool. Similar to making a tissue paper pom pom. Will have to try this for our next party!
Great! These look easy to made. I must try it. My daughter would love it. Thanks for sharing.
I love tutorials like this – thanks for sharing 🙂
Great post! You have an amazing blog:)
irenethayer.com
That's pretty cool! Thanks for sharing this great idea that will surely come in handy for the holidays and for birthday parties!
Oh I love crepe paper flowers for spring and summer decorating!! Thanks for showing us how and linking up with Funtastic Friday!
i love DIYs! This is perfect for any floral-themed party. Oh, and it's very easy too! a must-try indeed.
So easy and super cute! This is perfect for parties and other events. It could save money too 😊